Sunday, August 28, 2011

How to Download MP3 from Youtube Videos

Are you tired of finding Mp3 files of your choice? Do you want to download Mp3 music from youtube video without using any  converter? Then this post would helpyou download the mp3 file you want.


The following are simple steps in downloading;


1.  Go to Youtube and search a video you want to convert/extract to Mp3


2.  Copy the URL of the video
       Example: http://www.youtube.com/watch?v=PH658Oz6-zg


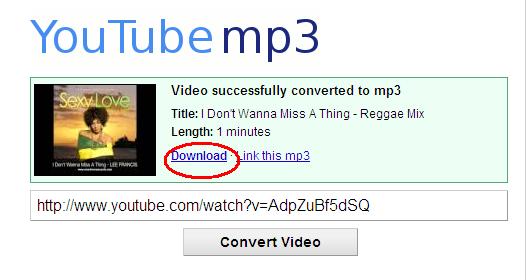
3.  Go to Youtube-mp3.org and paste the URL that you've copied and press Convert Video
     Wait until video processing is done


4.  Now Press Download - The file will now be download but instead of a video file it now be in Mp3 format


5.  Enjoy - For Questions, just post it here - Thanks.

Saturday, August 27, 2011

How to Ping - Stabilize your internet connection

One time I've noticed my dashboard wireless connection is in HSDPA connection and experienced a very good stable connection but most of the time I only got 3G which reflects slow data transfer. I observed that my dashboard will turn HSDPA when I am browsing and downloading, so I came up with a conclusion that my dashboard prioritize HSPDA every time I send data.


I want a stable connection, an HSDPA connection to stabilize my browsing and downloading experience. So I need to ping to stabilize my connection.


Tired of unstable internet wireless internet connection and want to experience it to the fullest? The following are easy steps to ping for stable connection.


1.  Click start and navigate Run
          Start> Run
2.  In the Run box type the command: 
          ping google.com -t
3.  It will open the command prompt and you will notice that your dashboard now displays HSDPA.


Ping Stats
Ping Stats

How to FlushDNS

Your Operating System and your DNS clients automatically cache the IP Address and other DNS of every page you want to visit, these is done to avoid the same request to the same host names.

Sometimes unwanted are results occur which will result into bad communication with the host. To solve this problem we need wait 24 hours for it to be automatically deleted or delete the currently saved DNS
manually.

The following are simple steps in flushing the DNS cache.

Windows XP/NT/98

1.  Press Start Button and Click Run
Run Box

2.  In the Run box type CMD and press Enter
Command Prompt will automatically run
3.  In the command prompt 
Type : ipconfig/flushdns
Command Prompt
Command Prompt

4. Done


Windows 7

1. Click the start button and find command prompt
Start > All Programs > Accesories > Command Prompt
2. Right Click Command Prompt and Run as Administrator
3. Type : ipconfig/flsuhdns

Thursday, August 11, 2011

How to Change USB Icon

Are you bored of the usual USB Icon displayed as default? If YES then you are on the right place to learn the trick.


Step 1. Open Notepad Application - Start > All Programs > Accessories 


Step 2. Copy and Paste the Code below


[Autorun]
icon=myicon.ico


Step 3.  Save the file as Autorun.inf on the USB root directory.


Step 4.  Find any Icon file and save it to on the USB root directory of your USB. Rename the file as myicon.ico You can download icon file on the net or you may use some image to icon file converting tool.


Note: myicon.ico on the code can be replaced by any name that you want


Step 5. Safely remove the USB device and plug it again. If unplugging will not work try restarting your system and view it again in My Computer.


”image

How to Insert Background Image for USB

1. Open Notepad then Copy and Open the following codes below and save it as desktop.ini


[{BE098140-A513-11D0-A3A4-00C04FD706EC}]

iconarea_image=back1.jpg

iconarea_text=0xFFFFFF

2. Prepare a picture/image that you want to appear as background. Rename it as back1.jpg.


Note: You can also change the name back1.jpg whatever the name that you wanted.


3. Refresh your device and viola your new background will be displayed.


USB Background Image


4. Now, we are going to hide the files that we have created earlier. It would be more appealing if we are going to hide it.


5. Right Click the file and choose Properties. The Properties Window will be displayed and click hidden.


Properties Dialog Box

Visit this post for Showing and Hiding Hidden Files

Wednesday, August 10, 2011

How to View Hidden Files

1. Go to the Menu Bar


2. Click Tools in the Menu Bar

3. Select Folder Options

The Folder Option Pop-up Menu will be displayed and will display several options

4. Click View Tab

5. Click Show Hidden files and folders

Now All Folders and Files that were hidden are now displayed as a semi transparent.

Monday, August 8, 2011

How to Block Websites without Using Any Software

Do you want to block any website but don't  want to use any software? Then this is the answer to your queries

Step 1. Browse C:\WINDOWS\system32\drivers\etc

Step 2. Find the file named Host 

Step 3. Open the document using Notepad

Step 4. Under "127.0.0.1 localhost" add 127.0.0.2 www.thesiteyouwanttoblock.com

The website after 127.0.0.2 will now automatically be blocked

Step 5. Done

If you wish to block another site just add 127.0.0.3 www.thesite1.com
127.0.0.4  www.thesite2.com
127.0.0.5  www.thesite3.com
and so on as many website you want to block

Sunday, August 7, 2011

Microsoft Word Keyboard Techniques - Guide

Here are some basic Keyboard Shortcuts for Microsoft Word

Ctrl+B - Bold
Ctrl+I - Italic
Ctrl+A - Select All
Ctrl +C -Copy
Ctrl + V - Paste
Ctrl + X - Cut
Ctrl+F -Find
Ctrl + E - Align Center
Ctrl+J - Justify
Ctrl+P - Print
Ctrl+Z - Undo
Ctrl+Y - Redo
Ctrl + K - Insert Link
Ctrl+ R -Align Right
Ctrl+L - Align Left
Ctrl+ M - Indent
Ctrl+End - Moves the cursor at the end of the document
Ctrl+Home - Moves the cursor at start of the document
Ctrl+Shift+F - Change Font
Ctrl + 1 - Single Space
Ctrl + 2 - Double Space
Ctrl +3 - 1.5 Space
Ctrl+N - Opens New Document
F12 - Save As
F1 - Help
F7 - Spelling and Grammar


The following keyboard techniques are applicable to all Microsoft word from Microsoft Word 97 - 2007
ENJOY!

Saturday, August 6, 2011

Microsoft Word MaGIC

Microsoft Word is one of the widely used word processor in the market. In this post I will teach you how to some Microsoft word tricks.


Step 1  Open Microsoft Word
Step 2  Type in  =rand(p,s)
               p = number of paragraph you want the sentences to appear
               s = number of sentences each paragraph would contain


Step 3 Press ENTER an viola your words and sentences are their

For Microsoft Word 97 - 2003

It will display - " The quick brown fox jumps over the lazy dog "

For Microsoft Word 2007


"On the Insert tab, the galleries include items that are designed to coordinate with the overall look of your document. You can use these galleries to insert tables, headers, footers, lists, cover pages, and other document building blocks.
When you create pictures, charts, or diagrams, they also coordinate with your current document look. You can easily change the formatting of selected text in the document text by choosing a look for the selected text from the Quick Styles gallery on the Home tab. "

Know your PC Gender

 Do you want to know the Gender of your PC? I'm sure you want to know your PC gender.

Step 1: Open Notepad or any word processing software

Step 2: Input : CreateObject("SAPI.SpVoice").Speak "I love you"

Step 3: Save the document as visual basic document- (Example Voice.vbs) on the desktop (This will help you easily access the script.

Step 4: Click the saved document and listen to your computer voice.

Step 5: Enjoy

My Computer is a Male- How about yours?

Tuesday, August 2, 2011

How to Get Back Old Facebook Chatbox

Most of the Facebook users are irritated and not comfortable with the new chatbox. Users are not comfortable of the features introduce by the new facebook chatbox.Now your discomfort is over because you can now get your old chatbox back.


                                                   CLICK -GOOGLE CHROME - SideBar Disabler
After Installation restart Chrome or you may press F5 for every open Facebook Tab

                                                                         CLICK HERE- Firefox


After Installation restart Google restart Mozilla Firefox and you will have your Chatbox.

Release Note

Version 1.7 (2011/07/31):
- Added manual buddy list refresh option.
- Added restartless feature in Firefox wrapper.
- Fixed long names not showing when contacts are typing.
- Fixed popped out chat closing after some seconds.
- Fixed FB rendering function that made buddy list always showing "Loading..." in some cases.
- Fixed empty list when searching in buddy list.
- Fixed some minor issues.

Monday, August 1, 2011

How to System Restore

System Restore is one of the helpful tool in Windows it takes your computer system back to a previous state. This feature will restore the critical files in your system like registry files to its normal state. This will help you prevent further damage on your system.

System Restore only scopes to the Registry Files ONLY thus it will not affect any documents created in your computer. Files created by any word processor and related software will still be retained. The following are simple steps to follow in doing System Restore.

1. Click Start button
2. Click Help and Support
3. Type System Restore in the Search Box


After executing System Restore you'll be prompted to choose a restore point where the system is still in its functional state.

Twitter Delicious Facebook Digg Stumbleupon Favorites More

 
Design by Free WordPress Themes | Bloggerized by Lasantha - Premium Blogger Themes | 100 Web Hosting